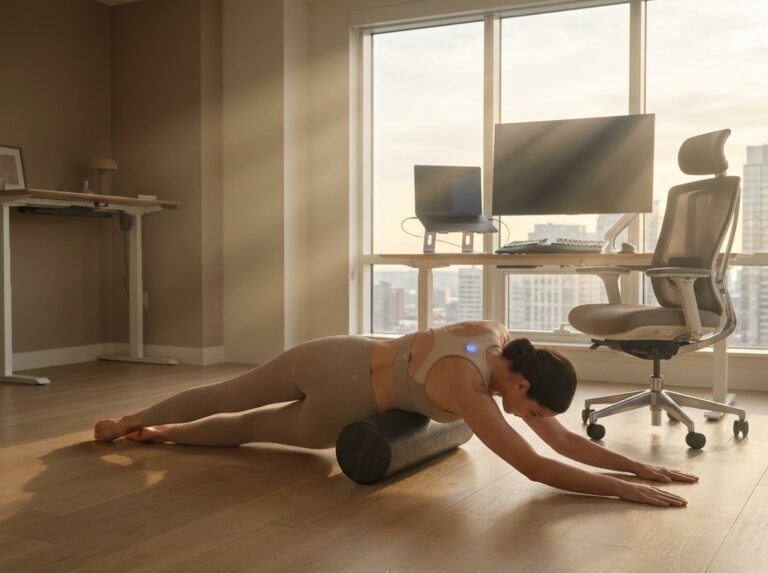
Anterior pelvic tilt — the exaggerated forward tilt of the pelvis common in prolonged sitting — fuels low back pain, tight hip flexors and weak glutes for office and remote workers. This article explains how ergonomic desk setup, targeted movement, and progressive exercise can reduce tilt, relieve pain, and restore efficient posture for workdays both at the office and at home.
What anterior pelvic tilt is and why office work contributes to it
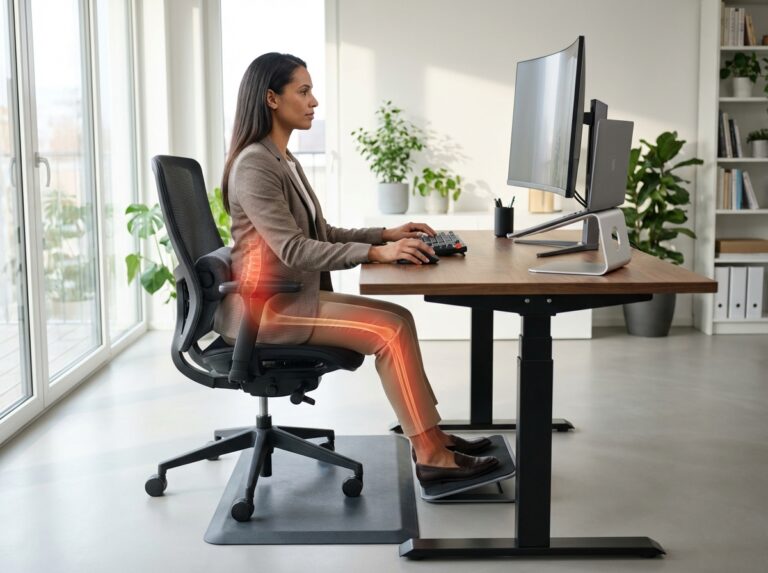
If you spend your days sitting at a desk, you might have noticed a change in your posture. Maybe your lower back has a more pronounced arch, or your stomach seems to stick out a bit, even if you haven’t gained weight. This common issue is often a sign of anterior pelvic tilt, or APT. Think of your pelvis as a bowl of water. In a neutral, healthy posture, the bowl is level. With an anterior pelvic tilt, the bowl tips forward, as if spilling water out the front. This forward rotation of the pelvis biomechanically forces your lumbar spine into an excessive curve, a condition called hyperlordosis. It’s the classic ‘office chair’ posture that so many of us unknowingly adopt over time.
This tilt isn’t a skeletal problem you were born with; it’s a functional issue driven by your muscles. Your body is incredibly adaptive, and when you sit for hours on end, day after day, it adapts to that position. This creates a predictable pattern of muscle imbalance, often called Lower Crossed Syndrome. The muscles on the front of your hips, your hip flexors like the iliopsoas and rectus femoris, become chronically short and tight. They are held in a flexed position all day, so they essentially learn to stay that way. At the same time, the muscles in your lower back, the lumbar erectors, become overactive and tight as they work constantly to stabilize your newly arched spine.
While these muscles get tight, the opposing muscles get weak and lazy. Your abdominal muscles, especially the lower ones that help stabilize the pelvis, become lengthened and underactive. Most importantly, your gluteal muscles, the powerhouse of your lower body, effectively ‘fall asleep’. This is a phenomenon known as gluteal inhibition or gluteal amnesia. Because they are stretched out and not required to do much while you’re sitting, your brain’s motor control patterns change. It learns to bypass the glutes and recruit other muscles, like the hamstrings and lower back, to do their job. This rewiring makes the problem worse, creating a feedback loop where weak glutes lead to more tilt, which leads to even weaker glutes.
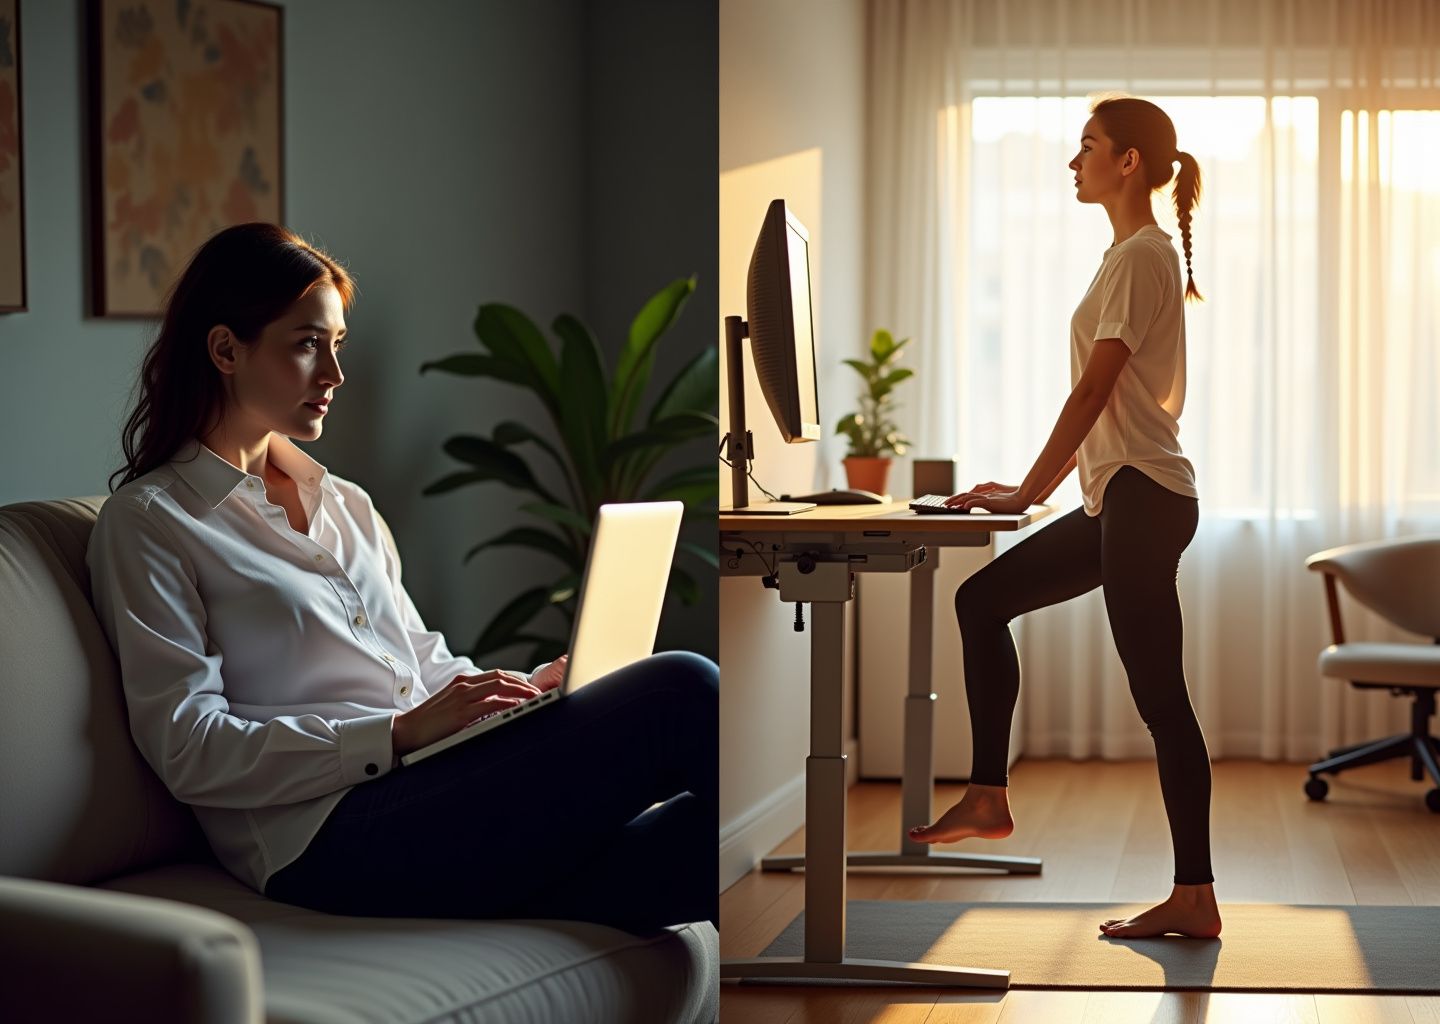
The modern workday is the perfect recipe for developing an anterior pelvic tilt. Prolonged, static sitting is the primary driver. Poorly designed office chairs that lack proper lumbar support or have a seat pan that’s too deep can encourage you to slide forward and let your pelvis tilt. But it’s not just the chair. The entire sedentary routine contributes. Occupational triggers common in both traditional office and remote work environments pour fuel on the fire. Long video calls keep you locked in one position, often with little thought to posture. Hours of static typing can encourage a forward head posture. This forward jut of the head creates a cascade of compensations down your spine to keep your eyes level, often ending with an exaggerated curve in the lower back and a tilted pelvis. And the increasingly common practice of working from the couch with a laptop is one of the fastest ways to develop these postural distortions.
This isn’t a rare condition; it’s practically an epidemic among the desk-based workforce. Research is making the connection clearer than ever. Studies focusing on desk workers consistently find that a significant percentage exhibit the muscle imbalances associated with Lower Crossed Syndrome, with common findings showing over half may have tight hip flexors and a staggering two-thirds can have demonstrable glute weakness. These numbers highlight just how pervasive the effects of an ergonomic desk setup, or lack thereof, can be.
The symptoms go far beyond just aesthetics. The most common complaint is persistent, nagging low back pain. This happens because the tilted pelvis creates compression points on the vertebrae in your lumbar spine. You might also notice reduced hip extension, which means you can’t fully straighten your hip joint. This can affect your walking gait, your ability to run, and your performance in sports. The gluteal inhibition means other muscles have to work overtime, leading to strain in the hamstrings and potential injury.
So, why does correcting an anterior pelvic tilt matter so much? It’s about more than just standing up straighter or looking better in photos. It is fundamental to your long-term health and well-being. By addressing the root cause, the muscle imbalances, you directly tackle a primary driver of chronic low back pain. Restoring proper pelvic alignment allows your spine to sit in a neutral, supported position, reducing joint compression and muscular strain. Waking up your dormant muscles through glute activation exercises and stretching out tight hip flexors provides a powerful, stable base for all your movements, from lifting a box to playing with your kids. This not only improves your performance in daily life but also significantly reduces your risk of future injury. A balanced pelvis is the foundation of a strong, pain-free body.
How to assess your posture and workspace with simple tests
Before you can effectively correct your posture, you need a clear picture of where you stand, literally. An honest assessment of your body and your workspace is the first step toward unwinding the patterns that contribute to anterior pelvic tilt. Think of this as gathering intelligence. These simple tests can be done at home or in the office, require minimal equipment, and will give you the specific data you need to target your efforts.
First, let’s assess your posture. This involves looking at your alignment and testing how key muscle groups are functioning.
- The Visual Self-Check
This is the simplest starting point. Stand sideways against a neutral-colored wall, wearing form-fitting clothes if possible. Have a friend take a photo of your entire body from the side, or set your phone on a timer. Look at the photo objectively. In a neutral posture, you should be able to draw a relatively straight line from your ear, through your shoulder, hip, and down to your ankle. With anterior pelvic tilt, you’ll likely notice an exaggerated curve in your lower back (increased lumbar lordosis) and a stomach that protrudes forward, even if you are lean. Your belt line will appear to slope downward at the front. - The Pelvis Landmark Check
For a more precise check, you need to find two bony landmarks on your pelvis. The first is the anterior superior iliac spine (ASIS), which are the two bony points at the very front of your hips. The second is the pubic symphysis, the bone at the front and center of your pelvis, just above your genitals. In a neutral pelvic position, the ASIS and the pubic symphysis should align in the same vertical plane. If you imagine a line connecting them, it should be perpendicular to the floor. In an anterior pelvic tilt, the ASIS will be significantly lower and further forward than the pubic symphysis, indicating the pelvis has tipped forward. - The Smartphone Inclinometer Method
To quantify your tilt, you can use a free inclinometer or level app on your smartphone. Lie on your back with your legs straight. Place your phone so the long edge rests across both of your ASIS points. Note the angle. While this isn’t a clinical measurement, it provides a useful baseline. A neutral pelvis typically reads between 0 and 5 degrees of anterior tilt. An angle greater than 10 degrees is a strong indicator of a significant anterior tilt that warrants attention.
Next, we’ll use functional tests to check for the muscle imbalances that cause and perpetuate this posture.
- The Thomas Test for Hip Flexor Tightness
Tight hip flexors are a primary driver of APT. To test them, sit on the edge of a sturdy table or bed. Lie back, pulling one knee firmly toward your chest to flatten your lower back against the surface. Let the other leg hang freely off the edge. If your hip flexors are flexible, the thigh of your hanging leg should be parallel to the floor or hang slightly below it, and your knee should remain bent to about 80 degrees. If the thigh lifts up, or if your knee straightens out to compensate, your hip flexors (iliopsoas and rectus femoris) are tight. - The Glute Bridge Test for Activation
Weak or inactive glutes are the other side of the APT coin. Lie on your back with your knees bent, feet flat on the floor hip-width apart, and your arms by your sides. Squeeze your glutes and lift your hips toward the ceiling until your body forms a straight line from your shoulders to your knees. Hold for two seconds. The key is where you feel the work. You should feel it primarily in your glutes. If you feel a strong contraction or cramping in your hamstrings or strain in your lower back, it’s a sign that your glutes are not firing properly and other muscles are compensating. - The Plank Test for Core Endurance
Your deep abdominal muscles act as a brace for your pelvis. To test their endurance, get into a plank position on your forearms and toes, keeping your body in a perfectly straight line. Don’t let your hips sag or rise. Hold this position with good form for as long as you can. An inability to hold a solid plank for at least 60 seconds suggests underlying core weakness, which makes it harder to maintain a neutral pelvic position.
Now, let’s turn our attention to your workspace. Your environment constantly shapes your posture.
Workstation Ergonomics Checklist
Take a moment to measure your setup against these ergonomic standards:
- Seat Height and Knee Angle Is your chair height set so your feet are flat on the floor (or on a footrest) with your knees bent at a 90 to 110-degree angle? Your thighs should be roughly parallel to the floor.
- Seat Pan Depth When you sit all the way back, can you fit two to three fingers between the front edge of the seat and the back of your knees? If the seat is too deep, it can encourage slouching or a posterior pelvic tilt while sitting, which can lead to a compensatory anterior tilt when you stand.
- Lumbar Support Does the backrest have a curve that fits into the small of your back? It should be positioned to support your natural lumbar curve, preventing you from arching or slumping.
- Monitor Height Is the top of your monitor at or just below your eye level? If you have to look down, you’ll naturally crane your neck and round your shoulders, which can pull your entire upper body forward and affect your pelvic alignment.
- Keyboard and Mouse Reach Are your keyboard and mouse close enough that your elbows can stay near your body, bent at around 90 degrees? Reaching forward for your peripherals encourages a forward lean that can exacerbate APT.
Finally, let’s tally your results. Use this simple checklist to gauge your risk level. Give yourself one point for each of the following issues you identified.
- Visible lower back arch in your side-profile photo.
- ASIS is clearly forward of your pubic symphysis.
- Positive Thomas test (thigh lifts off the table).
- Feeling the glute bridge in your hamstrings or back instead of your glutes.
- Unable to hold a proper plank for 60 seconds.
- Incorrect seat height or knee angle.
- Incorrect seat pan depth.
- Monitor is too low or too high.
- You consistently reach for your keyboard or mouse.
Scoring Your Risk
0–2 Points Low Risk. You may have minor issues, but your foundation is solid. Small tweaks should be sufficient.
3–5 Points Moderate Risk. You have several contributing factors that are likely reinforcing an anterior pelvic tilt. A consistent intervention is needed.
6+ Points High Risk. Your posture and workspace have significant issues that are actively promoting APT and likely contributing to discomfort. A comprehensive approach is essential.
It is crucial to know when self-assessment isn’t enough. If you experience any of the following red flags, please consult a doctor or physical therapist before starting any new exercise program.
Red Flags Requiring Clinician Evaluation
- Numbness, tingling, or radiating pain into your legs (sciatica).
- Progressive or unexplained weakness in your leg muscles.
- Severe pain that wakes you up at night or doesn’t change with position.
- Pain accompanied by other symptoms like fever or unexplained weight loss.
Plan to perform this full assessment every 2 to 4 weeks. Tracking your progress with photos and noting changes in your functional tests will keep you motivated and help you adjust your strategy as your body adapts.
Ergonomic desk setup routines and targeted exercises to reverse anterior pelvic tilt
After assessing your posture and workspace, the next step is to implement a structured plan to actively correct anterior pelvic tilt. This isn’t about a single magic fix, but a combination of immediate ergonomic adjustments, daily movement habits, and targeted exercises. This program is designed to systematically reverse the effects of prolonged sitting and build a more resilient posture.
Immediate Ergonomic Adjustments for Your Workstation
Your desk setup is the foundation. Small changes here provide constant postural support throughout your day.
- Chair Setup. Your chair should actively help you maintain a neutral pelvis. Adjust the seat height so your feet are flat on the floor and your knees are at a 90 to 110 degree angle. The lumbar support should fit into the natural curve of your lower back, right around your belt line. If the support is too high or too low, it can worsen your tilt. Adjust the seat pan so you have two to three fingers of space between the back of your knees and the edge of the seat. A slight forward tilt of the seat pan can also help encourage a neutral pelvic position.
- Monitor and Keyboard Alignment. Position your monitor directly in front of you, with the top of the screen at or slightly below eye level. This prevents you from craning your neck and leaning forward, a common trigger for anterior tilt. Your keyboard and mouse should be close enough that your elbows remain bent at roughly 90 degrees, with your shoulders relaxed.
- Supporting Accessories. If your feet don’t rest flat on the floor after adjusting your chair height, use a footrest. For chairs with flat seat pans, a wedge-shaped seat cushion can help tilt your pelvis into a more neutral alignment. If you primarily use a laptop, a docking station with an external monitor and keyboard is essential for long-term ergonomic health.
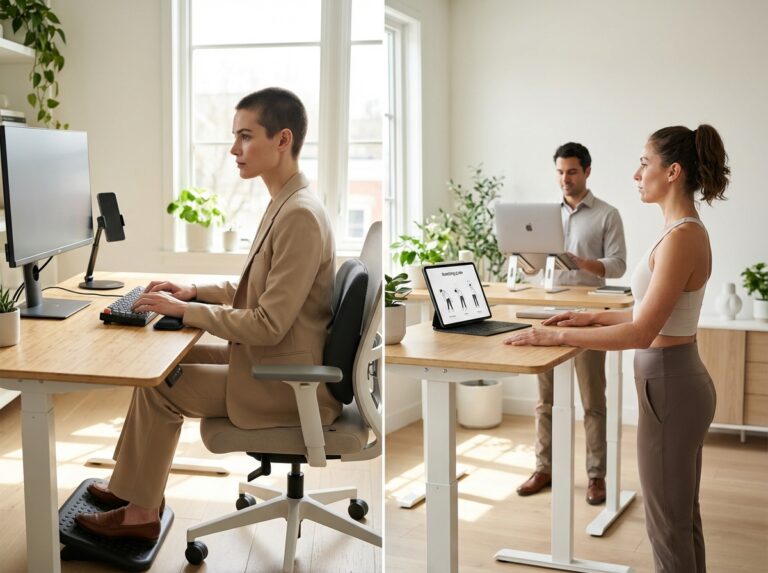
- Sit-Stand Desk Transitions. If you have a sit-stand desk, use it strategically. Aim to alternate between sitting and standing every 30 to 40 minutes. This cycle prevents your hip flexors from locking into a shortened position and encourages small, healthy movements throughout the day.
Daily Movement and Exercise Routine
Ergonomics sets the stage, but movement rewires the muscular imbalances that cause anterior pelvic tilt. Integrate these three layers of movement into your daily schedule.
1. Hourly Microbreaks (1-2 Minutes)
Set a timer to get up every hour. Stand, reach your arms overhead, and perform 5-10 gentle pelvic tilts. To do this, stand tall and imagine your pelvis is a bowl of water. Tilt it backward to “spill water out the back” (posterior tilt), then return to neutral. This small movement reactivates your core and glutes.
2. 5-Minute Standing Mobility Routine
Perform this short routine two to three times per day.
- Kneeling Hip Flexor Stretch. Kneel on one knee (use a cushion for comfort). Keep your torso upright and gently tuck your pelvis under until you feel a stretch in the front of your hip. Avoid arching your back. Hold for 30-60 seconds per side.
- Thoracic Rotations. Start on your hands and knees. Place one hand behind your head. Rotate that elbow up toward the ceiling, allowing your gaze to follow. Perform 10 slow repetitions per side.
3. 10-20 Minute Targeted Exercise Session
This is your main corrective workout. Aim for three sessions per week on non-consecutive days. Focus on form over speed.
Activation and Strengthening Exercises
- Glute Bridges. Lie on your back with knees bent and feet flat. Drive through your heels to lift your hips, squeezing your glutes at the top. Cue. Imagine holding a coin between your glutes.
- Beginner. 3 sets of 15 reps (bodyweight).
- Intermediate. 3 sets of 10-12 reps per side (single-leg).
- Advanced. 3 sets of 8-12 reps (with a weight across your hips).
- Dead Bugs. Lie on your back with arms extended and knees bent at 90 degrees over your hips. Press your lower back into the floor. Slowly lower your opposite arm and leg toward the ground, maintaining core tension.
- Beginner. 3 sets of 8 reps per side.
- Intermediate. 3 sets of 12 reps per side.
- Side Planks. Lie on your side, supported by your forearm. Lift your hips so your body forms a straight line.
- Beginner. 3 sets of 20-30 second holds per side.
- Intermediate. 3 sets of 45+ second holds or add leg raises.
- Hip Hinges. Stand with feet shoulder-width apart. Push your hips straight back, keeping your back flat, until you feel a stretch in your hamstrings. Squeeze your glutes to return to standing.
- Beginner. 3 sets of 10 reps (bodyweight).
- Intermediate. 3 sets of 8-12 reps (Romanian Deadlift with light weights).
Sustaining Improvements with Workflow Changes
Consistency is key. Weave these habits into your work life.
- Alternate Tasks. Align your sit-stand schedule with your tasks. Stand for more active work like phone calls or brainstorming. Sit for tasks requiring deep focus.
- Walking Meetings. Take phone calls while walking around your home or office. This simple change can add hundreds of steps and break up sedentary periods.
- Remote Worker Solutions. If you lack a dedicated office, improvise. Use a rolled-up towel for lumbar support on a dining chair. Stack books to elevate your laptop screen to eye level. The principles of ergonomics apply everywhere.
Safety and Tracking Your Progress
Listen to your body. Stop any exercise that causes sharp or radiating pain. If you experience persistent pain, numbness, or tingling, or if your symptoms do not improve after four weeks of consistent effort, consult a physical therapist. Pelvic imbalances can significantly impact disability and muscle performance, so professional guidance is crucial for chronic issues.
Track your progress to stay motivated. Take a side-profile photo every two weeks to visually monitor your pelvic alignment. Use a 0-10 pain scale to log your back discomfort daily. Finally, re-test your glute bridge and plank endurance every month to see your strength gains.
Common questions about anterior pelvic tilt and practical answers
You’ve adjusted your workstation and started the exercises, but questions always pop up along the way. Here are practical answers to the most common queries we hear from office workers tackling anterior pelvic tilt.
How long will it take to fix my anterior pelvic tilt?
There’s no magic switch, but you can feel a difference quickly. With consistent daily effort, you should notice reduced back stiffness and better posture awareness within 2 to 4 weeks. More significant, lasting changes to your resting posture typically take 3 to 6 months as your muscles adapt and strengthen. The key is consistency, not intensity. A little bit every day is far more effective than one heroic workout per week. Do this now: Commit to the 10-minute daily routine from the previous chapter for the next 14 days without skipping. That’s enough time to build a habit and feel the initial benefits.
Can years of sitting cause permanent damage to my posture?
It’s unlikely to be truly “permanent,” but prolonged sitting definitely creates stubborn muscle imbalances and fascial restrictions. Your body adapts to the positions you hold most often. The good news is that it can adapt back. Think of it less as permanent damage and more as a deeply ingrained habit that needs a dedicated counter-routine to change. The longer you’ve been sitting for a living, the more patient you’ll need to be. Do this now: Set a recurring timer on your phone or computer to stand up and walk around for 2 minutes every 30 minutes. This simple act interrupts the “sitting” signal your body receives all day.
What are the fastest exercises for immediate relief from that nagging low back ache?
For quick relief, focus on activating the weak muscles and gently mobilizing the tight ones. Do this now: Lie on your back and perform 2 sets of 15 Glute Bridges. Focus on squeezing your glutes to lift your hips, keeping your abs tight so your back doesn’t arch. Follow this with 30 seconds of a Kneeling Hip Flexor Stretch on each side. This combination wakes up your sleepy glutes and releases the tension in the front of your hips, providing an immediate feeling of balance and relief to your lower back.
I have a standing desk. Should I just stand all day?
Standing all day is just as problematic as sitting all day; it simply trades one static posture for another. The goal is movement and variety. The ideal rhythm is to alternate between sitting and standing. Do this now: Try the 30/30 rule. Sit for 30 minutes, then stand for 30 minutes. This cycle prevents your body from adapting too deeply to any single position and encourages small, frequent movements throughout the day.
What is the best type of office chair to help with anterior pelvic tilt?
The best chair is an adjustable one that supports a neutral pelvis. Look for three key features: 1) highly adjustable lumbar support that you can position perfectly in the small of your back, 2) a seat pan that can tilt forward a few degrees to encourage a neutral pelvic position, and 3) adjustable height and depth to ensure your feet are flat on the floor with your back against the backrest. Do this now: If your chair lacks good lumbar support, roll up a bath towel, secure it with rubber bands, and place it in the curve of your lower back. This simple hack can make a huge difference.
Will losing weight help my anterior pelvic tilt?
Yes, it can be a significant factor, particularly if you carry excess weight around your midsection. Abdominal fat exerts a constant downward and forward pull on the pelvis, mechanically worsening the tilt and increasing the strain on your lower back muscles. Combining postural exercises with a healthy diet and regular activity creates a powerful synergy for correcting your alignment.
Do my shoes really affect my pelvic tilt?
Absolutely. High heels are a primary offender. They force your body weight forward, causing your pelvis to tilt anteriorly to keep you from falling over. This shortens your hip flexors and calves over time. Do this now: Make flat, supportive shoes your default for daily wear. If you love your heels, treat them like a special occasion item and be sure to do extra calf and hip flexor stretches after wearing them.
I travel a lot and work from cafés. How can I protect my posture?
The key is to be prepared. Invest in a portable lumbar support pillow; it’s a small, lightweight tool that makes any chair more ergonomic. When working on a laptop, prop it up on a stack of books and use an external keyboard and mouse. This prevents the dreaded forward-hunch. Do this now: Find a small, firm pillow or a rolled-up sweater and place it behind your lower back the next time you’re working from a couch or café chair.
Is it okay to do these exercises if I already have low back pain?
For most people, gentle movement is the best thing for non-specific low back pain. Start with the lowest-impact exercises, like glute bridges and dead bugs, and focus on slow, controlled movements. Never push into sharp pain. If an exercise hurts, stop. The rule of thumb is that muscle fatigue or a stretching sensation is okay, but sharp, shooting, or radiating pain is not. If your pain is severe or doesn’t improve, it’s time to see a professional.
My glutes feel ‘dead.’ How can I train them more effectively?
This is incredibly common. The solution is to focus on activation and mind-muscle connection. Before every workout, do 2-3 sets of activation exercises like Clamshells and Banded Side Steps. During bigger movements like squats or bridges, consciously think about squeezing your glutes. Do this now: Stand up and practice squeezing one glute cheek as hard as you can for 10 seconds, then switch to the other. Do this a few times. This simple drill helps re-establish the neural connection to those muscles.
What’s the difference between anterior and posterior pelvic tilt?
Imagine your pelvis is a bowl of water. In anterior pelvic tilt (APT), the bowl tips forward, spilling water out the front. This creates a large arch in your lower back. In posterior pelvic tilt (PPT), the bowl tips backward, spilling water out the back. This flattens your lower back and often causes you to slouch. While APT is common in office workers when standing, many slouch into a PPT while sitting, which paradoxically tightens the hip flexors and contributes to APT when they stand up.
When should I stop trying to fix this myself and see a doctor or physical therapist?
You should seek professional help if you experience any of the following:
- Pain that is severe (a 7/10 or higher), constant, or wakes you up at night.
- You’ve been consistent with ergonomics and exercises for 4-6 weeks with zero improvement.
- You have numbness, tingling, or weakness that travels down your leg.
- Your back pain is accompanied by other symptoms like fever or unexplained weight loss.
A physical therapist can give you a specific diagnosis and a tailored plan that is much more effective than a general program.
Key takeaways and practical next steps
You’ve now learned the mechanics behind anterior pelvic tilt, why your office chair might be the culprit, and the specific muscle imbalances at play. The key is turning that knowledge into action. Overcoming the “office chair posture” isn’t about a single magic exercise or an expensive gadget. It’s about building a sustainable system that integrates better ergonomics, daily movement, and targeted strengthening. This is your roadmap to reclaiming control over your posture and putting an end to nagging low back pain. The goal is to make these changes feel less like a chore and more like a natural part of your workday.
Let’s distill everything into a simple, four-step plan you can start implementing today. Think of this as your practical guide for the next three months.
-
Assess Your Starting Point (5 Minutes)
Before you can fix the problem, you need to see it clearly. You don’t need special equipment for a basic assessment. Stand sideways in front of a full-length mirror wearing fitted clothing. Let your body relax into its usual stance. Now, look at your pelvis. Imagine a line drawn from the bony point at the front of your hip (your ASIS) to the bony point at the back. Is that line level with the floor, or is it tilted down at the front, creating a pronounced arch in your lower back? Another simple check is the wall test. Stand with your back against a wall, heels a few inches away. You should be able to slide a flat hand between your lower back and the wall. If you can easily fit your entire fist or more, you likely have a significant anterior tilt. Take a photo from the side. This isn’t for judgment; it’s your “before” picture that will motivate you later. -
Adjust Your Workstation First (15 Minutes)
You cannot out-exercise a bad ergonomic setup. This is the most critical step and provides the biggest return on your time. Before you do a single stretch, fix the environment that’s contributing to the problem.- Chair Height: Adjust your chair so your feet are flat on the floor and your knees are at or slightly below a 90-degree angle. Your thighs should be parallel to the floor. If your feet don’t reach, use a footrest.
- Lumbar Support: Your lower back should be supported in its natural curve. Use a dedicated lumbar pillow or a rolled-up towel placed at your belt line. This physically prevents your pelvis from rolling forward as you fatigue.
- Seat Depth: You should be able to fit two or three fingers between the back of your knees and the edge of the seat. This prevents the seat from cutting off circulation.
- Monitor Height: The top of your monitor should be at or just below eye level. This stops you from craning your neck forward, which can pull the rest of your spine out of alignment.
This one-time adjustment creates a passive support system that works for you eight hours a day.
-
Start a Daily Activation and Stretching Routine (10 Minutes)
This is your non-negotiable daily habit. The goal isn’t to get a workout; it’s to wake up dormant muscles and release tight ones. Set a calendar reminder for mid-morning or mid-afternoon.- Kneeling Hip Flexor Stretch: 30-60 seconds per side. Focus on tucking your tailbone under (a posterior pelvic tilt) to feel the stretch at the front of your hip, not just arching your back.
- Glute Bridges: 2 sets of 15 repetitions. Lie on your back with your knees bent. Focus on squeezing your glutes to lift your hips. This re-establishes the mind-muscle connection with your powerful hip extensors, which are often “asleep” in office workers. Studies show gluteal weakness is present in a majority of desk workers, making this a vital activation drill.
- Cat-Cow: 10-12 slow cycles. This mobilizes your spine and helps you consciously practice moving your pelvis between anterior and posterior tilts, improving your awareness and control.
This simple routine counteracts the negative effects of prolonged sitting in real-time.
-
Schedule Progressive Strengthening (20-30 Minutes, 2-3 Times a Week)
While the daily routine maintains balance, this is where you build the strength to hold a better posture permanently. Schedule these sessions like you would any important meeting. Focus on exercises that strengthen the weak muscles identified in lower crossed syndrome.- Core Stability: Planks (3 sets, hold for 30-60 seconds) and Dead Bugs (3 sets of 10-12 reps per side). These teach you to keep your pelvis stable while your limbs move.
- Glute and Hamstring Strength: Bodyweight Squats (3 sets of 12-15 reps) and Romanian Deadlifts (with light weight or just a band, 3 sets of 10-12 reps). Focus on hinging at your hips and keeping your spine neutral.
- Upper Back Strength: Band Pull-Aparts (3 sets of 15-20 reps). A strong upper back helps prevent the forward shoulder posture that often accompanies APT.
Your Timeline and How to Track Progress
Be patient and consistent. You are retraining years of postural habits.
- Weeks 1-4: Focus on consistency with your daily routine and ergonomic setup. You should start to feel less stiffness and may notice a slight reduction in back pain. Your main goal is building the habit.
- Weeks 4-12: You should see noticeable changes. Your “after” photo might show a more neutral pelvis. Your pain scores should be consistently lower. You might find you can sit for longer periods without discomfort or that you feel stronger during your workouts.
Monitor your progress with more than just photos. Use a simple 0-10 pain scale and jot down your score at the end of each workday. Note functional wins, like being able to pick something up without your back twinging.
When to Escalate to a Professional
Self-correction is powerful, but it has its limits. As outlined in the assessment section, you should consult a physical therapist or medical doctor if you experience severe or radiating pain, numbness, or weakness in your legs, or if your condition fails to improve after several weeks of consistent effort. A professional can provide a precise diagnosis, rule out more serious issues, and give you a personalized plan to accelerate your progress safely.
Ultimately, correcting anterior pelvic tilt is about creating a better relationship with your body throughout the workday. It’s about understanding that posture is dynamic, not static. By fixing your environment, committing to a few key movements each day, and building foundational strength, you are not just fixing a postural issue. You are investing in a future with less pain, better movement, and more energy, both in and out of the office.
Sources
- Effects of Pelvic-Tilt Imbalance on Disability, Muscle Performance … — This was a cross-sectional study conducted in a physical therapy clinic on forty-one office workers diagnosed with non-specific low-back pain.
- Upper body posture changes during sitting in female office workers … — The LCS type A leads to an excessive anterior pelvic tilt and increased lumbar lordosis, often resisted by tightness of the hip flexors and low back extensors …
- Exercise Prevents Low Back Pain in Sedentary Office Workers — An anterior pelvic tilt is likely the most commonly noted postural change in those exhibiting Lumbo Pelvic Hip Complex Dysfunction (LPHCD) .
Legal Disclaimers & Brand Notices
General Medical Disclaimer: The content provided in this article, including all text, graphics, images, and information regarding posture, exercises, and physical assessments, is for informational purposes only. It is not intended to be a substitute for professional medical advice, diagnosis, or treatment. Always seek the advice of a qualified healthcare provider, such as a physician or physical therapist, with any questions you may have regarding a medical condition, exercise program, or before starting any new treatment plan.
If you experience any sharp pain, numbness, tingling, or radiating symptoms (red flags), stop the activity immediately and consult a medical professional.
Trademark and Brand Notice: All product names, logos, and brands mentioned or implied are the property of their respective owners. Their use does not imply any affiliation with or endorsement by them.